Wednesday, August 6, 2014

Fermenting Pickles: A Hopefully Simple Tutorial

First let's talk about the basics: The basic process is to wash and clean cucumbers, add them to a seasoned salt water brine and allow time to run it's course in a room temperature environment. As time goes on the vegetable will release Lactobacillus into the brine (Lactic Acid) and you will end up with a wonderful tasting pickle. You may encounter some yeast, mold, or scum along the way.
Then off to the fridge they go, where the culture will be slowed to a craw, and your pickles can be stored until you are done eating them. 

Things that impact your pickle making process:
Time
Sterility
Freshness of produce
External Temperature
                                                        Light
                                                        Salt content

Hopefully this tutorial will help you in making a wonderful, and tasty old fashioned pickle full of tummy loving good bacteria.

This recipe is for a 2 gallon crock, or 2 one gallon jars.

10 lbs pickling cucumbers- the fresher the better
2/3 cup non-iodized salt without caking agent. (canning salt, pickling salt, kosher salt, sea salt etc.) Keep in mind each flake size of salt is different. This recipe is using kosher salt so if you are using a large flake salt from the high reaches of the Himalayan mountains you might need a little more to achieve the same salinity. 
4-6 tablespoon of pickling seasoning
10 heads of dill (You can never have too much dill in a dill pickle.) 
6 cloves of garlic (optional, but you are not eating MY pickles if you don't include it!) 
1-2 chili peppers if desired. (optional) 
Non chlorinated water
Grape or oak leaves to cover your jar. 

As you can tell my pickling recipe is very based on taste. I learned from an old Jewish recipe that is like a lot of old recipes- a splash, a dash, a shake of this or that. I did modify it for safe canning practices. 

The only things you can't adapt are the salt amount, and don't add sugar.

1) Start by inspecting your cucumbers for softness, and rot, and scraping the blossom end off the cucumber.

This is the blossom end of the cucumber. It's brown and paper and comes off easily with a butter knife, or a fingernail.

The blossom should be removed entirely.


 See the contrast? The one on the right has it's blossom end totally removed.
This is a blossom end removed.
Then give your cucumbers a good washing! This will wash away any residual blossom, or dirt. Wash them in a bowl of clear water to help refresh older cucumbers.

DO NOT USE SOAP! ESPECIALLY ANTI-MICROBIAL/ANTI-BACTERIAL SOAP
It can impact your ferment. If you are concerned about pesticide residue fill a large bowl with cool water and vinegar and then rinse well.


Now it's time to fill our jar! I'm using a 2 gallon Anchor Hocking glass canister for my ferments. These can be purchased for about $10 at Wal-Mart or at second hand stores. I like this jar because it has a loose fitting lid that gas can escape.

You can use pickling crocks, gallon jars, half gallon jars, quarts, or food grade buckets with lids and airlocks. Basically what I'm saying is don't go out and spend a fortune to learn to pickle. Use whatever you can get your hands on.


I add all spices, garlic and dill to the bottom of the jar to stop them from floating to the top. In pickling air creates spoilage so the more you can keep in the brine the better.

Once all of your spices are in add your salt. (We had to add more salt due to the large flake of the salt we had on hand.) The salt is a very important part of this process. It both draws the natural juices out of the vegetables, and also preserves the produce until the lactic acid takes over. DO NOT TRY TO CUT THE SALT DOWN! This is not a low salt process.

Add about 1/2 cup of filtered, non-chlorinated water to the bottom of the jar to create a strong salt brine.
Now jam your cucumbers in! They work best when you stack them length wise tight in your jar. In larger containers you can do two layers of pickles. The tighter the pickles are in the jar, the less likely they are to float when you pour your water in.

Because this jar doesn't taper at the top we put the grape leaves in between the rows of cucumbers.

This is a gallon jar, filled with two layers of cucumbers and then grape leaves are added on top.

Fill your jar to the top with water, covering all the vegetables, and put a loose fitting lid on top.
Air needs to escape your brine. If using mason jars don't use the lids, only the rings with a clean kitchen towel or paper towel inserted.

For this process I like non-chlorinated water without fluoride, but do not use distilled water.


Place your jar in a cool dark place. Pickle cultures do best in an environment between 40-74 degrees F. Any hotter and you could get yeast over growth that will soften pickles, any cooler and your ferment will slow to a crawl. If your house is hotter then 74 degrees (like mine) any glass container can be set in a bowl, or tote full of cool water to maintain a more even fermentation temperature.

Check your  ferment daily. Push any vegetables back under the brine to prevent spoilage, and make sure you scrape any scum off the top of the brine. Scum will be a off white film with out fuzzy mold, or odd colors.

Small patches of mold can form too. Gray and fuzzy is harmless but might make your ferment a little "earthier" in flavor.

This is day 2 of a pickle making. One pickle has managed to float to the top and will need to be pushed back down into the brine. Notice the bubbles, they are a good sign that your culture is working!

Fermentation time is variable based on temperature, and the longer you allow them to sit the more intense they become. Test one after a week, but it can take up to 4 weeks depending on temperature, and how fermented you like your pickle.

A finished pickle will turn olive in color, and be translucent. The brine will also be cloudy and that is okay.


MY FAVORITE QUESTION:

HOW DO I KNOW IF MY PICKLE WENT BAD? 

Humans survival has been closely linked to determining if food is bad using our instincts. Does it look bad? Does it smell bad? Does it feel bad? Does it taste bad?
Notice the order? You have 3 senses you use before anything ever gets into your mouth. And if you still decide to taste it, a bad pickle will not be swallowed!

If a pickle has red or pink mold, an off smell, or is slimy don't eat it!

Trust me! You will know when a pickle brine as gone bad. 

But let's not end on that note! 

This is 25lbs of pickles. What are you going to do with all of those pickles? Most people don't have enough room in their fridge. You are able to can your fermented pickle! As long as your ph is under 4.6 your pickle is safe for canning! I test mine with test strips from the brewery supply store, or you can use this guide produced by the government and add vinegar to your batch: What your government says to do.

I do not personally like vinegar added my ferment, because part of the reason I ferment is to avoid the vinegar. But I do follow their canning process in the link above when I get ready to can.
Also if you notice their recipe requires a great deal more salt because of the vinegar and salt need to strike a balance. This is a newer guideline, but it is the guideline so I'm including it. Anything you do otherwise is obviously at your own (relatively low) risk. Notice also the time frame for a fermented pickle is much longer with vinegar.


And finally you should know you can ferment in spears, sandwich slices, pickle chips or whole.
Processing times will very based on how much inner flesh of the pickle is exposed because the brine will permeate faster then with whole pickles, and lactic acid will be released faster. 

I hope this helps in your pickling journey! Don't be afraid, worst case you throw away some cucumbers and start over! 

Saturday, December 14, 2013

Chickpeas Stewed in African Peanut Sauce with Sweet Potatoes and Brown Rice

Becoming a vegetarian as a young adult greatly influenced my interest in cooking. When I first became a vegetarian I found it challenging to make the recipes I loved as a meat eater adapted to my new vegetarian diet. When I got married the challenge grew because I had someone else to cook for! Someone who wasn't a vegetarian, and who wasn't open to becoming a vegetarian.

In order to get my husband to eat vegetarian I have to entice him. I have to bait him with new flavors, interesting textures, and me proudly announcing that our families entire dinner only cost a few dollars! 

Recently I found a contest focused on frozen vegetarian foods from Cedarlane Foods, and was enticed to enter. Even though it was a voting contest and I've sworn them off my mind started racing with the kind of food and flavors I would want in a frozen vegetarian meal. The end result was me trying my hand at making several vegetarian entrees and freezing enough meals that my family will have dinner on busy nights during the holidays. Some of the meals were old standbys I had never though to freeze, and some of the meals featured new and interesting flavors. 

All of my recipes can be seen in the links below: 
Feel free to vote on one of these recipes, or all of them. My favorite is the African peanut sauce.

The best part of this recipe contest is that I ended up with so many cook ahead meal in my freezer! It will be great for the holiday season when things are so much busier, but I have a feeling we'll be adding these wonderful meals into our regular rotation year round. 

Chickpeas in African Peanut Sauce Over Rice with Sweet Potatoes and Red Peppers

Sweet potatoes:
1 Tbsp. Peanut Oil
2 Sweet Potatoes peeled and diced
Salt and pepper
Preheat oven to 375 degrees
Coat sweet potatoes in oil and roast in the oven for about 1 hour or until sweet potatoes are tender.
Peanut Sauce:
½ Tbsp. peanut oil
1 white onion diced
2 green peppers diced
2 cloves garlic
2 cups water
1 can of tomatoes
1 cup of low sugar natural peanut butter
Salt and pepper
¼ tsp red chili pepper flakes (optional)
2 cups of prepared and drained chickpeas (or 2 cans)
In a heavy skillet add oil and onions and cook until translucent. Add peppers, and garlic and cook until peppers just softened. Add water, tomatoes, peanut butter and season to taste. Add red chili pepper flakes and allow to simmer for about 15 minutes until flavors are combined. Add chickpeas and heat through.

Serve over long grain brown rice.

The greatest part of this dish is watching my husbands face as he tries it and proclaims it good. Knowing he will go to his office with left overs proudly, and that I replaced another hamburger in the course of his life with something much much better. 

Friday, November 22, 2013

It's Friday! How about a drink? Sloe Gin Fizz

I'm from Portland, Oregon so when the song Portland, Oregon came out by Loretta Lynn and Jack White I was naturally a fan, the lyrics start like this:

"Well, Portland Oregon and sloe gin fizz
If that ain't love, then tell me what is, uh huh, uh huh"

As a Portland girl this song grabbed my attention, after all I like my home, I like fizz, and I like gin... but what on earth is a sloe? (Sounds like slow) I decided to start a journey that required me to look for liquor in two shops before enjoying this Loretta Lynn inspired cocktail.

If you are wondering why you have never heard of a sloe gin but Loretta Lynn has, it's because it's a really old drink. It was popular before prohibition in America, and then received a resurgence in the 1950's. I was not alive during either of these periods.

To start out with let's talk about sloe. Sloe (Prunus spinosa) also known as a blackthorn bush is a bush that grows in the UK.

The berries themselves are astringent, but they make a tasty cordial. If you happen to have some sloe sitting around you can make your own sloe gin by following direction here: 

http://www.choosy-beggars.com/index.php/2011/01/27/what-to-drink-this-week-sloe-gin/

But I don't, so instead I bought this:
and this:
Made Simple Syrup- It was simple!
1/4 cup sugar 1/2 cup water. Cook until dissolved and chill for any time you want to get your drink on.
If you don't want to make that much, or way way more the recipe is simple. 1 to 2 ratio. 1 part sugar, 2 parts water.

And made this:
Sloe Gin Fizz
1 oz slow gin
1 oz gin
1/2 oz lemon juice
1/2 oz simple syrup
3-4oz soda water
Add everything but the soda water to a martini shaker and shake with a few ice cubes. Then pour into a glass and top with soda water. The idea is to pour the soda water in a way that it fizzes.

Let's be honest- I made a pitcher of this drink to share, and drank it on Tuesday. And Wednesday. And Friday.

Friday, November 15, 2013

What ugly pasta taught me about life!

Over the summer I was browsing garage sales when I came across a hand crank pasta maker roller with two cutter attachments.  It was older, but still in the box and gleaming metal. I was interested, but the $10 sticker made me recoil. I had talked myself out of it when someone from the porch yelled, “$5 and it’s yours!” I stopped right in my tracks, I had $5 in my wallet. It was sold. When I got home I found out it was an Atlas Marcato and it they cost a pretty penny.

I've always had a dream of making wonderfully fresh pasta from scratch, like a little Italian lady in my kitchen. In my mind it’s always so beautiful, and artistic. It’s like an old movie, with soft light filtering in through a window, I’m standing lovingly over a floured board. I’m wearing an apron and a dress from the 1940’s with my hair pinned up. In reality, my hair is in a sloppy bun, I’m in a promotional t-shirt from some brewpub I visited, and a pair of yoga pants with a flour hand print on my butt because I couldn't find a towel and someone knocked on the door.  As the pasta tears I yell “Come on! What’s wrong with you! Please don’t rip again!” and I hear my daughter mimicking me as she pleads with her pretend food to cooperate in the family room.

Some of the highlights of my pasta making adventure: 

#1 This recipe makes way more pasta then I thought it would.
2 cups of water
A pinch of salt
3 eggs
2 tablespoons of olive oil
Water if it needs to be thinned more.
In a mixer combine flour and salt. Sift together. Make a well in the middle and add eggs slowly with mixer on low. Alternate one egg, olive oil until the dough is smooth and elastic. Use water if the dough requires it.


#2 Pasta making is not the kind of thing where you wake up one day and you are amazing at it. Especially ravioli, it’s going to take a while before I master ravioli.

#3 When you make a copious amount of pasta, it’s important to find places to set it all down between rolling. I thought I was being cleaver and doubled the recipe because my husband loves pasta and his birthday is coming up. Not smart! I ended up only rolling out only half of the pasta and desperately looking for a place to set it all. I learned that coat hangers hung from cupboards a perfect pasta drying racks in a pinch.
(As a bonus check out my rad 1951 General Motors double oven!)

At the end of the day I ended up with the sloppiest, ugliest looking plate of walnut and goat cheese stuffed ravioli ever imaginable… that looked like a pile of mushy ashen flesh, served two hours after I was planning on having dinner ready. But with my eyes shut it was amazing! The point of is that every cook makes mistakes. Even good cooks make mistakes. Even great cooks make mistake. Even professional chefs make mistakes. It’s the mistakes that really challenge us and make us grow into something better. This is not just true in kitchen, but in every aspect in life. Time to dust the flour hand print off my ass and get back into the kitchen. 

Wednesday, September 26, 2012

Vegetable soup and dumplings (chicken and dumplings for the vegetarian)


I stopped in the store desperately searching for something to serve for dinner. I wanted something seasonal and something that feels like fall. Although the sky is blue and sunny, there is a fall chill in the air that makes me seek warm and comforting food. In the organic section were these beautiful carrots in a rainbow of colors with rich green tops. That was it! I was going to cook with those carrots tonight! I decided on vegetable soup with dumplings.


Making soup in only a few hours is hard because it doesn’t typically build the depth of flavor that I would like. Making vegetarian soup is even harder because meat adds a lot of flavor to soups. Here are a few tricks I've come up with to help solve this problem.
1)      Brown your butter
2)      Add nutritional yeast
3)      Add booze
4)      Add condensed soup

All of these things develop flavor in the soup that otherwise you wouldn't get to experience. Nutritional yeast is exceptionally helpful with "chicken" dishes because it adds a chickeniness that otherwise you'll be missing.

Soup Stock:

2 tablespoons butter


1/2 white onion
2 organic carrots
2 stalks celery
1 1/2 cups vegetable stock (or chicken free chicken stock)
1 tablespoon poultry seasoning
1 tablespoon nutritional yeast
8oz hard cider (4 for the soup, 4 for the chef)
8oz cream of mushroom soup
1 cup frozen peas
In a large dutch oven melt butter on low until pan is preheated and butter is golden brown. Add onions, carrots and celery and cook until they are slightly soft and browned. Add 1 1/2 cups of vegetable stock, poultry seasoning, nutritional yeast and hard cider. Allow to cook until vegetables are tender and alcohol is cooked out.
 
(this is a really good time to enjoy that cider!)
Add cream of mushroom soup, and frozen peas and allow to reach a boil again.
 
While soup is cooking prepare dumpling dough. In Mark Bittman's How to Cook Everything he says "You can make dumplings with almost anything even flour and water. But I strongly believe they out to taste like something." I took that to heart when making dumplings adding soup stock and an extra punch of flavor with cream of mushroom soup.
When it comes to cream of mushroom soup I'm also pretty brand loyal to Pacific Natural Foods Organic Condensed Cream of Mushroom soup. This soup is so good that I will eat it on its own! If a condensed soup is so bad you can't eat it straight why put it into food?
 
Dumplings:
4 tablespoons softened butter
2 large eggs
1 tablespoon cream of mushroom soup concentrate
1 cup flour
1 teaspoon baking powder
1 teaspoon poultry seasoning
Stock  (about 3 tablespoons)
Cream softened butter, add eggs and cream of mushroom soup until just combined.
Sift together flour, baking powder and poultry seasoning. Add gradually to egg mixture. Add stock from soup one tablespoon at a time until dough looks like a thick pancake batter.
Add to boiling soup stock by dropping with a spoon and allow to cook covered for about 10 minutes. Flip dumplings and cook uncovered for another 5 minutes until dough is cooked through.
 
There you have it! A house that smells like fall, and a warm tummy from your apple cider consumption. :)


Monday, July 23, 2012

A Scone story- When mistakes make happy new discoveries.

Last night I made mini cream scones.This was the first time I’ve made scones in my stand mixer was amazed by what quick work it made of scone making. Before scones took forever to mix by hand with knives or a pastry cutter that they were slightly labor intensive, but still worth it. I’m just thankful it’s easier now. I can simply whip up a batch! (If you are mixing by hand, I’ve found the best way to go is to actually use your hands by squeezing the meal through your fingers to make the course meal.)

I’ve also made a mistake by not really following the recipe last night. I’ve made scones so many times that I figured I didn’t really need to read directions, and instead ended up with something kind of new.  A traditional scone requires you to chop the butter into small bits, and blend the chilled butter in with the flour to make a course meal first, and then add the milk or cream to your scone. I made a happy mistake last night by being lazy and not really chopping the butter up as fine, and adding the half and half in too soon while the butter wasn’t exactly incorporated into a course meal. It created scones that had layers akin to “Grand’s Biscuits” only with the flavor and crumb of a scone.  Because we were playing cards I decided it was best to do well of jam in the middle of each scone instead of serving jam at the table. Less mess with all the same flavor. They were gone by the evening end and left me wanting more today. So more I made.

Here is the recipe below:
Pre-heat oven to 425 degrees

2 cups all-purpose flour
1 tablespoon baking powder
3 tablespoon sugar
1/2 teaspoon salt
6 tablespoons chilled butter (3 tablespoons cut into pea size pieces and 3 tablespoons cut larger.)
1 cup half and half
Jam- either home canned for store bought works, but I find light sugar works best.

Sift together flour, baking powder, sugar and salt. Add in chilled butter and mix a few times until about half of it is a course meal. Add in half and half and mix until just combined. Large chunks of butter will remain.

Turn out onto a floured board and form into four equal round balls. Cut through the center of each ball to divide into 4ths to make mini scones. Either keep triangle shape, or form into rounds and place on ungreased baking sheet.

In each scone make a small well with your index finger and thumb. Spoon in a dollop of jam into each scone. Bake for 10-12 minutes.

 Makes 16 mini scones.

Sunday, July 22, 2012

Guess what I did this weekend? It involved me, findout what it takes to make a good mother, and 4 bottles of white wine.

Guess what I did this weekend? It involved me, finding out what it takes to makes a good mother, and 4 bottles of white wine.

 If you guessed starting to make white wine vinegar then you are right! I started down this rabbit hole on Saturday when I decided that I wanted to make raspberry sage vinegar for salad dressing. After looking at several recipes for raspberry vinegar they all required that a person make their salad dressing with white wine vinegar. Funny thing, I’ve never noticed white wine vinegar! I know I’ve had rice vinegar, white distilled vinegar, and white balsamic vinegar but never white wine vinegar.  I checked Costco and Cash & Carry and no one had white vinegar in the amounts that I needed make my salad dressing dreams come true. Then it hit me! I can make my own vinegar! So off I went, first looking for the “mother” but it seems that once a person gets a mother they can keep storing and feeding it, and they don’t need to buy more mothers, so no one in the local area sells vinegar mothers any longer.

I think it must have been amusing to the brew guy to watch the light turn on in my head and say “hey what stops me from using apple cider vinegar with the yeast already in the bottle?” he said to me “See that is why we don’t sell the mothers any longer.” So there I was, willing to add a little bit of apple cider vinegar to my white wine. So off to buy some cheap wine, good old Charles Shaw! But Also I decided to add some cheap Riesling as well to make it lighter fruitier white wine vinegar. It doesn’t matter if the wine costs a lot, it’s more about using what I think will taste decent.  

I started my vinegar with one jar of apple cider vinegar with the mother in the bottom of the jar, two bottles of cheap Chardonnay, and two cheap bottles of Riesling. I poured everything in a glass jar and now we are playing the waiting game. In about 8-12 weeks I’ll have white wine vinegar ready to use in all kinds of recipes. The best part is that right about then we’ll be coming into apple season, and I’ll be able to use my mother to make apple cider vinegar.  It’s also important to cover the crock to protect them from light.
                                                         The couldy color is from the "mother"

The only problem is that I have raspberries that are ready now and sitting in my fridge! I got so excited about the vinegar that I totally forgot about the raspberries. What to do with those before the vinegar is ready? I decided to try a few different things with these berries. The first one is allowing the berries to sit in a combination of white vinegar and water with herbs, the second one is even less vinegar,  and the third jar are raspberries that are being fermented the same way my pickles are fermented. 1 Tsp Whey and a bit of salt.  I’ve added herbs (you are looking at sage, tarragon, and an greek oregino) and garlic to these jars to add flavor. When I tasted the berries today it was amazing the flavor contrast between the jars. The vinegar really zaps the flavor out of the berries and compeats with it. It's the food version of someone screaming really loud when you are trying to listen to music.


Below is a phot of my kitchen (yes it's world's ugliest) and my strange fermented jars that my little girl is growing up thinking is normal and that everyone keeps in their kitchen.  The only problem is that jar is my pickle crock and pickle season is going to be very soon. So it looks like transfering a giant crock of cheap wine is going to be on my to do list today.

Tuesday, July 10, 2012

A Murder in The Kitchen- Based on a True Story


In a hot kitchen in the middle of summer a woman stood at the counter. She had been in the kitchen for hours, diligently working while her husband was out. She was exhausted, and sweat beaded on her forehead as she thought about what she was going to do. She had been angry for a long time, a quiet anger that no one knew was there, but deep in the pit of her stomach she knew that she could no longer endure anymore abuse.  After years of hoping it was going to somehow get better on its own, she had started to plot her course to take matters into her own hand. This wasn’t a choice she took lightly, and it certainly wasn’t going to make her life any easier but she knew it was something that had to be done and today was the day she was going to do it!

She could hear her husband put his key into the door, that familiar click of the deadbolt retracting. The knob turned and the door was shut gently behind him. She heard the clank of the keys fall onto the entry way table and his shoes drop to the floor as he moved through.   She could tell by the way he stepped that he was in a good mood, as he came towards the kitchen. He obviously didn’t know what was waiting for him just around the corner. She smiled with satisfaction knowing he was in for a surprise. One more step and he would be there.  And then he was there! With a look of shock and disbelief he stood frozen in his steps.

She pulled the hammer back and the kitchen echoed BAM! BAM! BAM! BAM!  Deep red splattered across the kitchen counter, spraying in little droplets across her face and apron.  She could hear small drips as they ran down the cutting board and onto the floor. She picked up a bit of deep red flesh and examined it, satisfied with her work, and again she pulled the hammer back BAM! BAM! BAM! She inspected her hands as red streamed down her fingers. She enjoyed the sticky feeling on her hands, the deep inner parts of something now exposed. She smiled knowing that it was done! She has finally stood up to an evil that had distressed her for far too long and breathed a sigh of relief.  It wasn’t as hard as she thought it was going to be.  

She began to clean up the mess as she heard a voice calling from behind her.

 “Wow!” He exclaimed. “That is a lot of cherries honey! Let me help you clean up!”

 She took her hand off the cherry pitter and moved away as he started to dismantle it. It was time to start canning the sweet juicy fruit that started her journey away from the modern food chain.

Oh…You thought there was going to be a murder didn’t you?  In your mind you imagined a woman, taken for granted as she suffered through an abusive and destructive relationship ready to put an end to her abuser. But what you imagined was right! She is a woman who was in a destructive relationship, a destructive relationship with her food supply. A relationship where day after day she consumed food from distant toxic farms and factories, filled with science more than food. And although consumers have made it clear they would prefer their food to just be food, it has not phased the food science industry from inventing, and concealing this frankenfood in our food supply. And in a way there is a murder. In every person who removes even part of their families food out of the modern food supply chain a little bit of this system of abuse is put to death.  

I am happy to be part of this death, contributing every time I am able to pick up real food from local farms, and placing money and jobs back into my local economy. Every time I put food up on my shelves in glistening glass jars of fresh fruit and pickled vegetables my heart is warm with the knowledge of exactly what my daughter is eating. A movement of people that is no more political than it was 100 years ago when our grandparents and great grandparents did it. So today I write with cherry stained hands as I move forward in hopes that someday the memories of store bought jam, and vegetables swimming around in BPA liners will be a distant memory for our family.  So tonight I’m not just making a dish for the night, or an interesting recipe I found, but something much more important. Tonight I’m making food for my family, pure real food that I will store away for the entire year and keep my family fed on fresh real food far after the season has come and gone.
This is 40lbs of cherries canned

Wednesday, June 13, 2012

Wholesome food, dirty oven- my take on a plum tart.

   While walking through a local produce store I found myself next to a bin of fruit. I reached my hand in, and plucked out a firm and lovely plum. It was obviously not ripe yet, but they were so lovely I ended up with 12 of them. I took them home with intention of family to eat them out of hand. Little girl on the other hand seemed to have the attention to complain about how awful plums are. I now had 10 plums and only I was going to be eating them. Without a doubt they would go bad before I had a chance to eat them, so it was time for a plan B. Plum tart!

I first started out with a recipe from Ina Garten
But as you know already, I can’t follow a recipe to save my life. Faster than I was able to chop almonds I had adapted this recipe into something entirely different. The end result was a rustic tart made with wheat flour, oats and almonds and sweetened with honey. All the favors worked well together, and the wholesomeness made it a dessert that isn't horrible for you.


Pre-heat oven to 400 degrees

Crumb topping:

2 cups whole wheat flour
1 cup oats
2/3 cup almonds diced fine
2/3 cup honey
1 egg
1 stick cold unsalted butter cut into pea size pieces

 Combine flour, oats, almonds, honey and egg and mix either by hand or with a stand mixer. Gradually add butter a little bit at a time until mixture is just combined and has a slight crumble. Because of the use of honey instead of sugar this mixture will be damper then most dough for tarts and crumbles.


Press dough into a 9 ½ spring form pan, or into a well-greased tart pan. Reserve about 1/3 of the mixture for topping.

Filling:

About 7-8 Plums cut into 8ths


I was playing around a lot with how to cut a plum without mangling it beyond recognition and I found the easiest way for me was to cut all the way around the plum into 8ths, and then use my knife to pop the first little segments out. After that it was easier to cut away from the stone and get the plum pieces out intact.


Arrange plum wedges around pan starting on the outside and working your way in. Eventually it will look like a pretty flower, or at least tidy. Then cover up your masterpiece with more dough evenly spread over the plum mixture like you are rolling over the Mona Lisa with a paint roller.


Bake at 400 degrees for about 45 minutes. This oven is a little bit off on temperature being that it was manufactured by General Motors somewhere around 1950 so a good way to tell if your tart is done is if the plums are bubbling, the crust is golden and your house gives off that fresh from the oven baked good smell.

Photo of very old, very dirty oven baking tart above in the event you didn't believe an oven that old could still exist and work. The clock is always set to 5 past 7 although the second hand still ticks around the clock face, the time never changes, and you can tell how small it is by the fact that the pan you are looking at is a 9 1/2 inch spring form pan! But there is an even smaller oven below this one so I don't find I miss the cooking space very often.


Saturday, June 2, 2012

Enchilada sauce adventures!

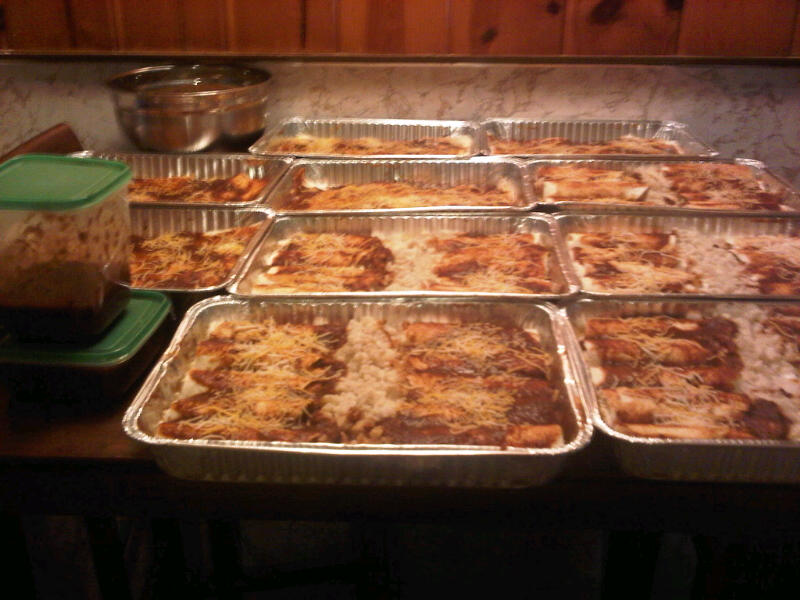
Let’s face it, life is busy! And because of it I’ve been spending a lot of time and money on convenience food and take-out meals recently to feed my family. It’s not only expensive, but it’s also a lot of frankenfood I am not exactly proud to put on my table. So to combat this issue I’ve turned to freezer meals as a simple solution to get real food on the table on nights that are too busy to cook. Recently I’ve made 10 pans of lasagna, and today made 10 pans of cheese enchiladas with brown rice. I was surprised by the sheer mass of food it takes to fill 10 pans of food! Huge portions of onions, 4 of cheese and an entire bag of Costco tortillas, but what amazed me the most was how inexpensive it was to make my own enchilada sauce. While calculating the cost of each unit of enchiladas I decided it was not economical to buy pre-made sauce. It would raise my cost per pan by more then I was willing to pay, and included more artificial ingredients then I was willing to eat. Instead I made this simple enchilada sauce below that I ended up very pleased with. Keep in mind this makes a lot of sauce! It will make about 6qts of sauce, but this sauce freezes well, or you can make 10 pans of enchiladas and still have about 16 oz. of sauce left over for another meal as you can see below.


It starts with a puree of chilies. The pepper used here is Chili Negro and can be found in most supermarkets, or Hispanic markets.  
1 table spoon olive oil
2 large white onion
4 gloves garlic
2 bags chili negro
2 cups water

In a large Dutch oven add olive oil and onions; cook until onions are slightly translucent. Add garlic and continue to cook. Seed chilies and put into pot. Add hot water and cook until chilies are soft and re hydrated.

After chilies are cooled pour into blender and blend until smooth.

To make the rest of the sauce:
Chile paste above
2 large cans tomato sauce
1 large tomato can filled with water
1 cup vinegar
1 tsp Mexican oregano
1 tbsp cumin
1 tbsp salt
1 tbsp California chili powder
1/2 tsp cinnamon

Simmer until flavors are well combined.

This sauce was rich and dark. The pepper adds an almost raisin flavor with a slight sweetness and a mild heat. The seasoning adds earthiness and the tomato and vinegar add bright slightly tart vibrancy. I’m really pleased with this sauce and will use it again and again. The best part of it is though is the price! My sauce works out to be about 0.02 cents an ounce, whereas this Old El Paso sauce is .13 cents an ounce if purchased at amazon. It might not seem like a lot of savings when looking at it oz by oz but when you make 192oz of sauce this is $24.96 vs $4.41 (not including shipping of 12.57) and this is where our savings are! We are talking just a hair shy of 25.00 on savings just by making our own sauce- and the best part is, it tastes better!

I hope you enjoy. If you end up making your own sauce I would love to hear about it. Drop me a line and let me know.

Monday, May 28, 2012

Vanilla Bean Lemon Cupcakes- and the saga of the butter cream

I am a fly by the seat of my pants kind of cook, a pinch of this, a dash of that, season to taste, readapt. I have to admit I’m a whirl wind in the kitchen. But because of this I can’t follow a recipe to save my life! This style of cooking works well for most things, but not for baking!  So when I was asked to bring dessert for my Grandmother’s Birthday my panicked mind raced through what I could make for her. I have a very short list of things bake well, and figured no one wanted Italian bread for dessert. The last time I made a cake for her, it was a spice cake out of a box that we attempted to frost while not cooled totally, and it fell apart, melted frosting, crumbled cake, and at the end of the day a “scrambled birthday cake.”  This cake had to be better than that and it was with that memory that I decided it was time to finally face my fears of the cupcake.

Now to be honest I’ve never made a cake from scratch before! So I decided I would start my journey with a search for a lemon cupcake and came across an amazing blog http://quartercupkitchen.wordpress.com/ where there was a lovely lemon cupcake that was drool worthy! I made one change using a real vanilla bean instead of vanilla extract because I wanted the specks. I also adapted the language to read the way I read recipes when I cook, but this is really still her recipe.

Lemon Cupcakes (makes 28)

3 cups unbleached flour
2 cups sugar
3 tsp baking powder
1 tsp salt
2 sticks unsalted butter at room temp.
1 cup reduced fat sour cream
3 eggs plus 2 egg yolks
Scrapings of half a vanilla bean
Zest and juice from two lemons
 Preheat oven to 350 degrees.
In an electric mixer combine flour, sugar, baking powder, and salt. Gently add butter, sour cream, eggs vanilla beans and lemon and mix until combined. Fill lined muffin tins half way full and bake 20-22 minutes turning once throughout.